How to install AREDN in a Virtual Machine on Proxmox
- Starkzarn
- Homelab , Ham Radio , Networking , Linux
- 13 Apr, 2025
AREDN as a Proxmox Workload
Proxmox Virtual Environment (PVE) is a fantastic open source resource for homelabbers and production hyperconverged infrastructure alike. It does come with ocassional challenges though, and getting AREDN running as a workload on PVE is one of those challenges — although through no fault of PVE. This is a quick run-through of how I managed to get an amd64 (x86_64) architecture version of AREDN running on my Proxmox cluster.
Prerequisites
Prior to making this work, you’ll need:
- A working Proxmox environment
- Command line access to said Proxmox host
- An AREDN x86_64 image from https://downloads.arednmesh.org/snapshots/targets/x86/64/
- I’m choosing to use the nightly, but you may use a release. Just ensure that you choose the x86_64 architecture.
- I’m choosing to use the UEFI image (ending in
combined-efi.img.gz), in the hopes that IOMMU and other hardware pass-through will work easily in the future. The rest of this walkthrough will make the assumption that you’re using this as well, although instructions can be easily modified to work with a conventional MBR BIOS image.
- A solid understanding of networking, specifically VLANs
- A managed switch (software or hardware), that supports VLAN tagging.
- A bridge interface on your PVE host that has the
VLAN Awaresetting enabled, and appropriate VLANs trunked to that physical interface in your switch. - Pre-defined VLANs for your AREDN WAN network and your AREDN LAN network. The mesh side is all managed in the AREDN VM itself. NAT is going to work against us here.
Warning
If you’re hoping to dive into this and hook up a radio via IOMMU or hardware passthrough, you’ll be sorely disappointed, as it isn’t currently supported. You can however use a DtD link with another router and a radio hanging off of it. See: this issue for details…
Prep for Install
- Download or transfer your AREDN image to the PVE node you’ll be working on.
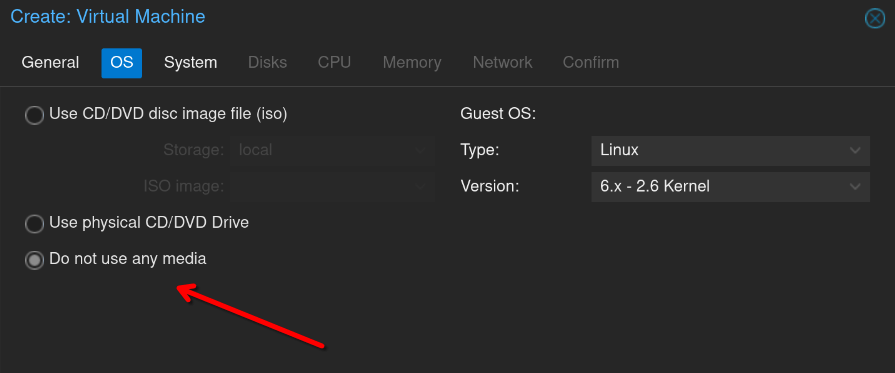
- Create a new Virtual Machine
- Do not use any install media when prompted, as we’ll be importing the premade image we just downloaded.
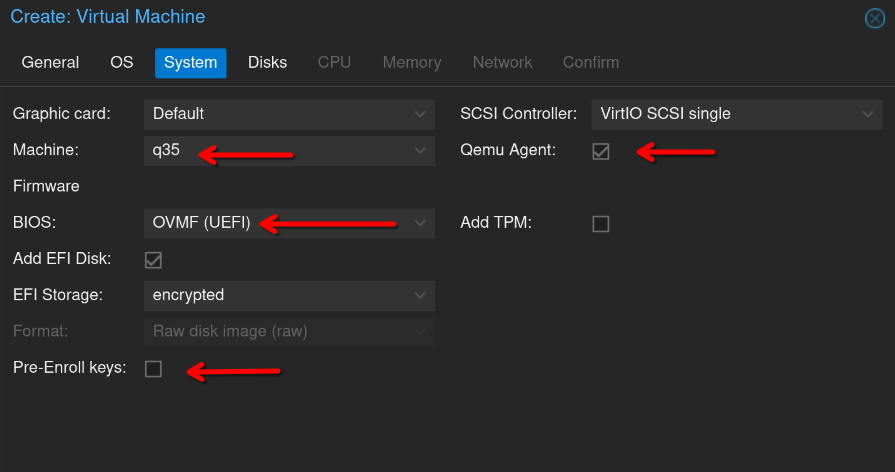
- Change the machine type to
q35, change the BIOS type toOVMF (UEFI), select your storage, uncheckPre-Enroll keys, and enableQemu Agent.
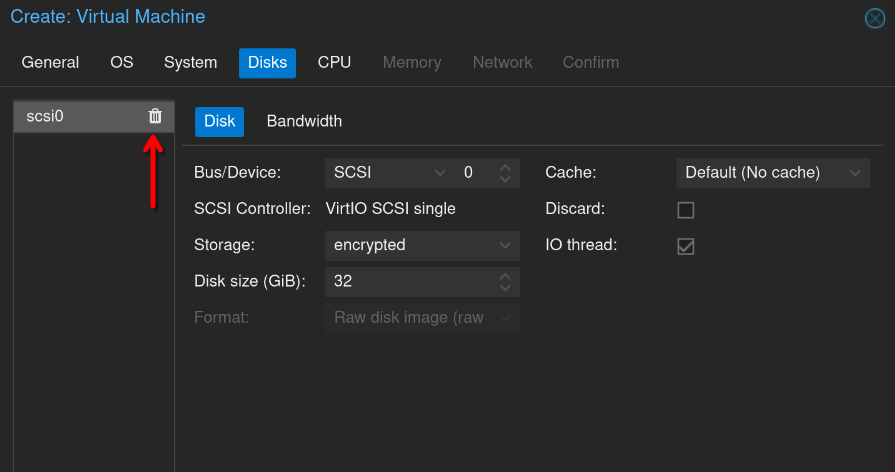
- Delete the virtual disk that is prepopulated by default. Again, we’ll be importing the premade image.
- Defaults are fine for the rest of the settings, as we’ll be adjusting network interfaces manually later. You probably don’t need as much RAM as it wants to allocate either. 1024MB (1GiB) has been more than enough for me.
- Confirm and finish. Don’t boot up the VM yet.
Import AREDN Image
You have a fresh new VM configured, but it doesn’t have any storage or install media. We’ll take care of this with some command-line magic. You can either do this from the Shell menu of your PVE node, or you can SSH into the machine. You will need to know where you downloaded AREDN image is located on the disk, the ID that is assigned to your VM — that’s the three-digit number before its name in the workload listing (117 in my case), and the name of your storage pool.
We’re going to run the following commands on the PVE host, substituting in your VM ID, the path to your AREDN image, and your storage pool name where appropriate.
gunzip aredn-20250409-1ccfefd8-x86-64-generic-ext4-combined-efi.img.gz
qm importdisk 117 ./aredn-20250409-1ccfefd8-x86-64-generic-ext4-combined-efi.img encrypted
Final Configuration
Hardware configuration
We won’t need the default CD drive that is added to VMs, so you can remove that from the Hardware menu of the virtual machine.
Remove the EFI disk to force a fallback to UEFI chainloading. (I know this is weird, but it was necessary because the EFI image doesn’t properly manage a boot partition). Do this the same way you removed the CDROM drive.
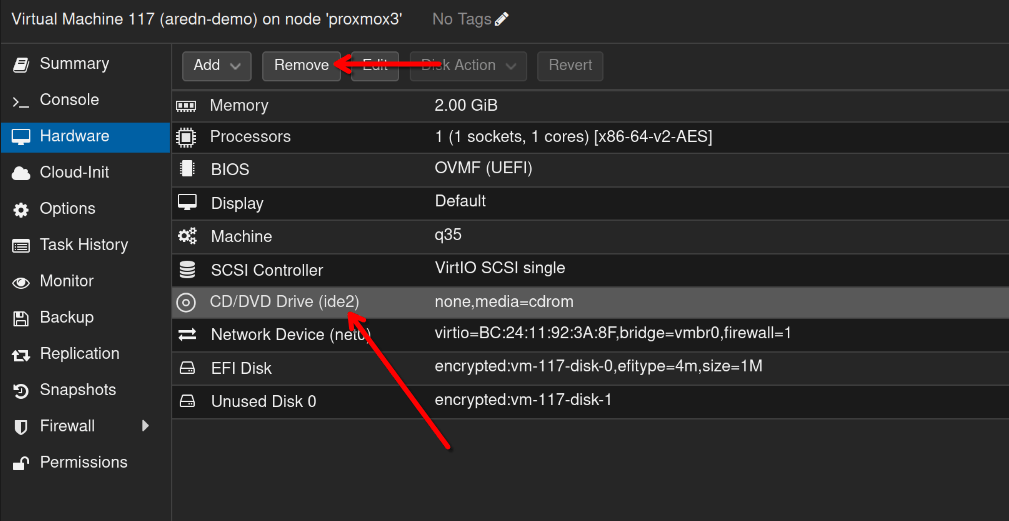
Now delete the EFI disk entirely. It will probably be called Unused Disk 1. If you weren’t paying attention to which one populated when removing the EFI disk, you can reference the STDOUT from your qm importdisk command. It will return unused XXX: successfully imported ... vm-XXX-disk-X. The disk-X portion is the important part and tells you which one not to delete.
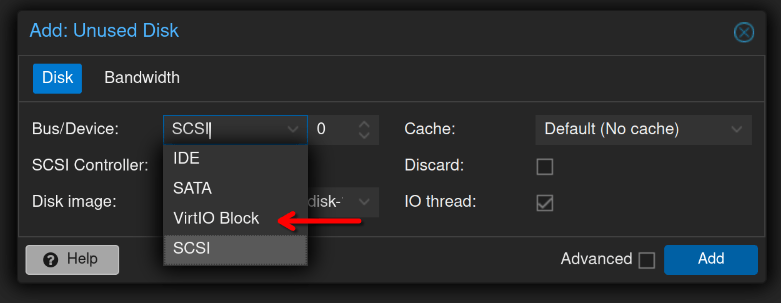
Double click the single unused disk entry and change the bus to VirtIO Block. This will yield the best performance and host/guest synergy for the virtual block device. After clicking Add you should have your AREDN image assigned as the only disk in the VM!
Tip
Consider expanding the disk now to whatever size you’d like for storage moving forward.
We’re going to save the bulk of the network configuration for later, but you do need to have the WAN interface of your AREDN VM successfully grab a DHCP lease from your local network. This will enable internet connectivity for package installations as well as provide us a method of accessing the webUI later. If you need to assign a VLAN tag to your network interface, do that now.
Boot Configuration
Now flip over to the Options menu in the VM. We need to change the boot order. Double-click Boot Order, which likely just says net0 right now, and select the checkbox for your disk and uncheck the net0 checkbox. You can also change Use tablet for pointer from Yes to No, as this is only for workloads with a GUI and will oddly save you a few processor cycles.
Boot Up
Head over to the Console tab and start up the VM! Finally! Give the machine a couple seconds to start and then hit Enter to get an active console.
We need to do initial provisioning, which is accomplished with the firstuse_setup command. Once you get an interactive console run: firstuse_setup YOURCALL Password, substituting your desired hostname (which should likely be your callsign and an identifier like QTH, etc.) and a strong password. Make sure you record this password in your password manager for later! The command will return an IP address, but this is meaningless at the moment because it is a LAN IP assigned by the AREDN DHCPv4 server and you will be unable to access it from your workstation due to NAT.

Reboot your VM by issuing the reboot command in the console session. It will likely reboot at least twice. When it is done, hit ENTER again to get a new console.
Network Configuration
Up through this point, we have not had a working network connection that rendered our VM accessible from your local LAN. We’re about to change that. You’re going to need to know a little about vim to edit a configuration file. If you haven’t used it before, we’ll get through this together…
Note
This makes the assumption that you want a DHCP lease for your AREDN WAN configuration, i.e. your AREDN machine’s WAN interface is going to be served by your local LAN.
- We need to tell OpenWRT to treat the WAN port as an untagged interface, instead of terminating a VLAN tag there. This should allow your WAN to get a DHCP lease. Run
vim /etc/aredn_include/wan.network.userand paste the following contents into that file.
config bridge-vlan
option device 'br0'
option vlan '1'
list ports 'eth0:u'

config device
option name 'br-wan'
option type 'bridge'
option macaddr '<wan_mac>'
list ports 'br0.1'

config interface 'wan'
option device 'br-wan'
option proto 'dhcp'
Info
For template values, look at the /etc/config and /etc/config.mesh. Unlike vanilla OpenWRT, AREDN dynamically generates the UCI config from the /etc/aredn_include and /etc/config.mesh values, so you can’t make changes in the direct config files or using the uci command line if you want them to persist!
- Save the file and reboot the VM:
reboot. - The VM will probably reboot at least one additional time as it applies the config changes.
- Assuming all is well, you should now have your AREDN VM up on the network and the webUI will be accessible at the WAN DHCP lease address. Yay!
Tip
If you’re unsure what IP address the AREDN VM grabbed (or you don’t know if it worked), type ip a show br-wan into the console and you should see an RFC1918 IP address.
- Open a new browser tab and type the IP address into the navigation bar:
http://192.168.4.112for example (Use your VM’s IP). Verify the web interface comes up. Don’t change anything yet though, we need to add some interfaces. - Power off the VM:
poweroff
Adding network interfaces.
AREDN by default is configured to use one interface with several VLANs trunked through it, one for WAN, one for LAN, and one for mesh radio. Because we’re running this as a VM, we don’t need this additional complexity (and likely couldn’t use it unless you’re running Q-in-Q on your home network…). Navigate back to your PVE webUI and the AREDN VM’s settings, specifically the Hardware tab.
Warning
The following instructions are pretty specific to my usecase here and the way I am terminating and managing VLANs. I’m including it not so much as specific instructions to follow in a rote manner, but as a framework for others exploring. You will probably need at least one additional interface for the LAN though.
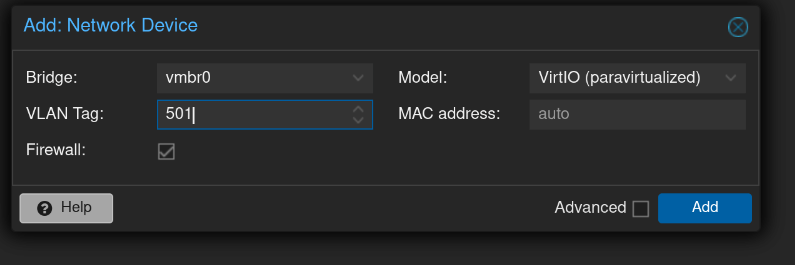
- Click
Addand selectNetwork Device - Keep the new virtual NIC on the same bridge that your original one is one (probably the default
vmbr0). Assign a VLAN tag for one of your previously configured VLANs. We’ll treat this first additional interface as the LAN.
I chose to let AREDN run the DHCP server for this subnet, so on my OPNSense inteface configuration, I assigned it a static IP that was not the gateway, in my case I chose 254 for the last octet, as I’m using a /24 network. I also disabled the DHCP server on this interface. AREDN is going to handle IP addressing.
- Add one more network interface in the same manner as before, with another VLAN tag. This is going to be our AREDN DtD network. You should now have three interfaces. The first is the AREDN WAN interface that we already confirmed works, the second will be the LAN interface, and the third will be the the trunk to handle DtD if necessary.
Final configuration
Power back up your VM, watch the console to make sure everything works. Since the hardware configuration changed, it will probably reboot once. Navigate back to the webUI that we found earlier. We’re going to assign these additional interfaces.
- Click on the avatar icon in the top right corner and enter your password (configured through
firstuse_setup) to login. - Click on the
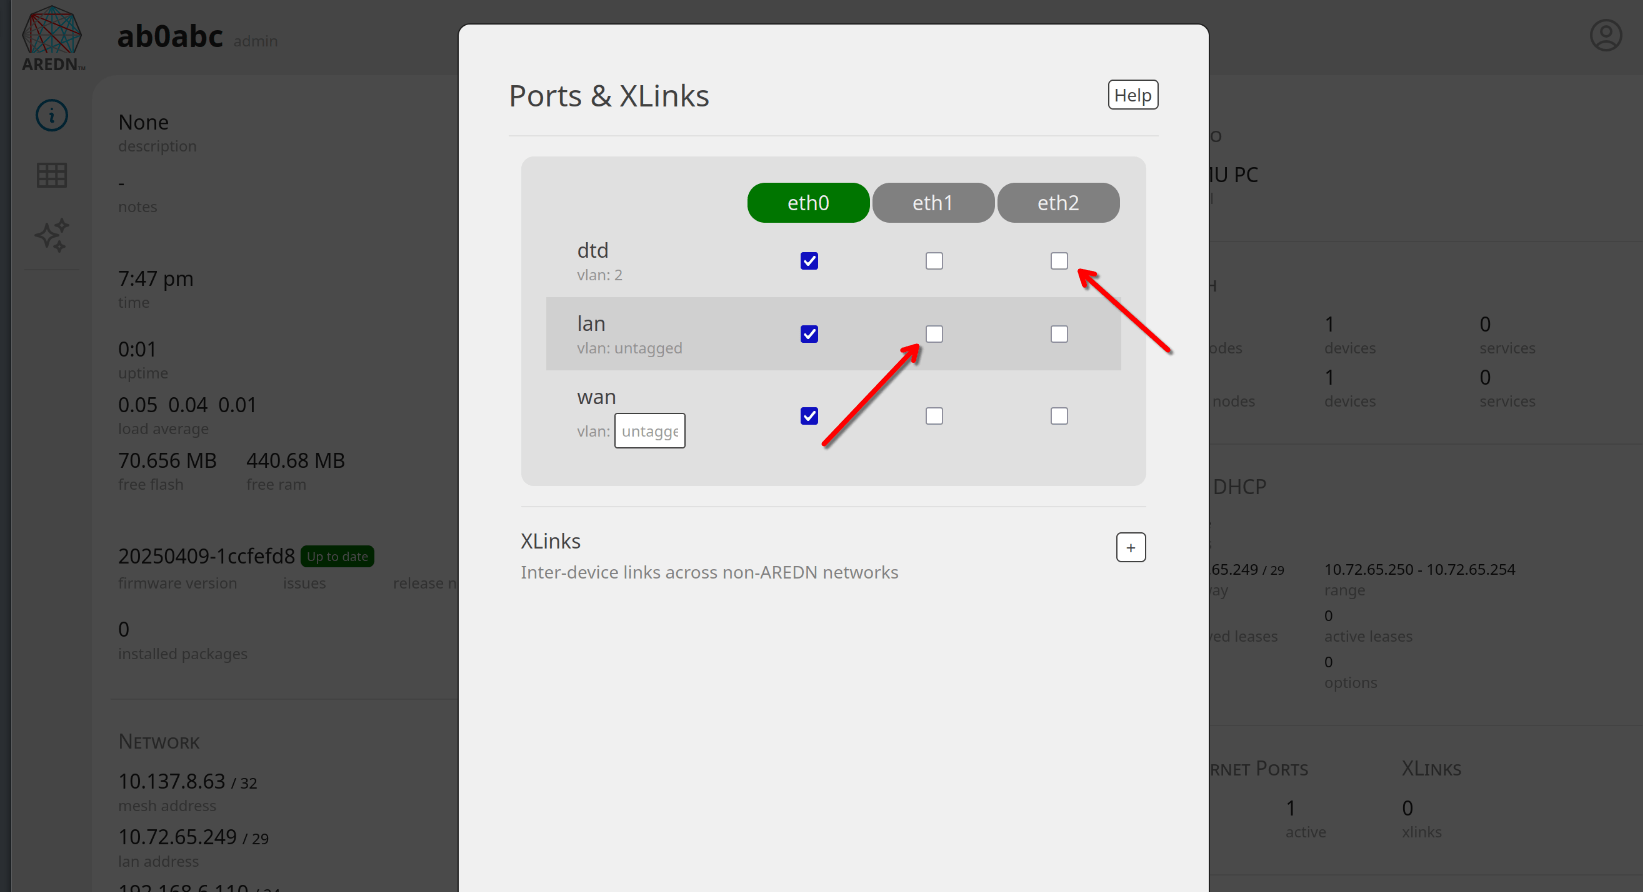
Ethernet Portssection to bring up the interface configuration.
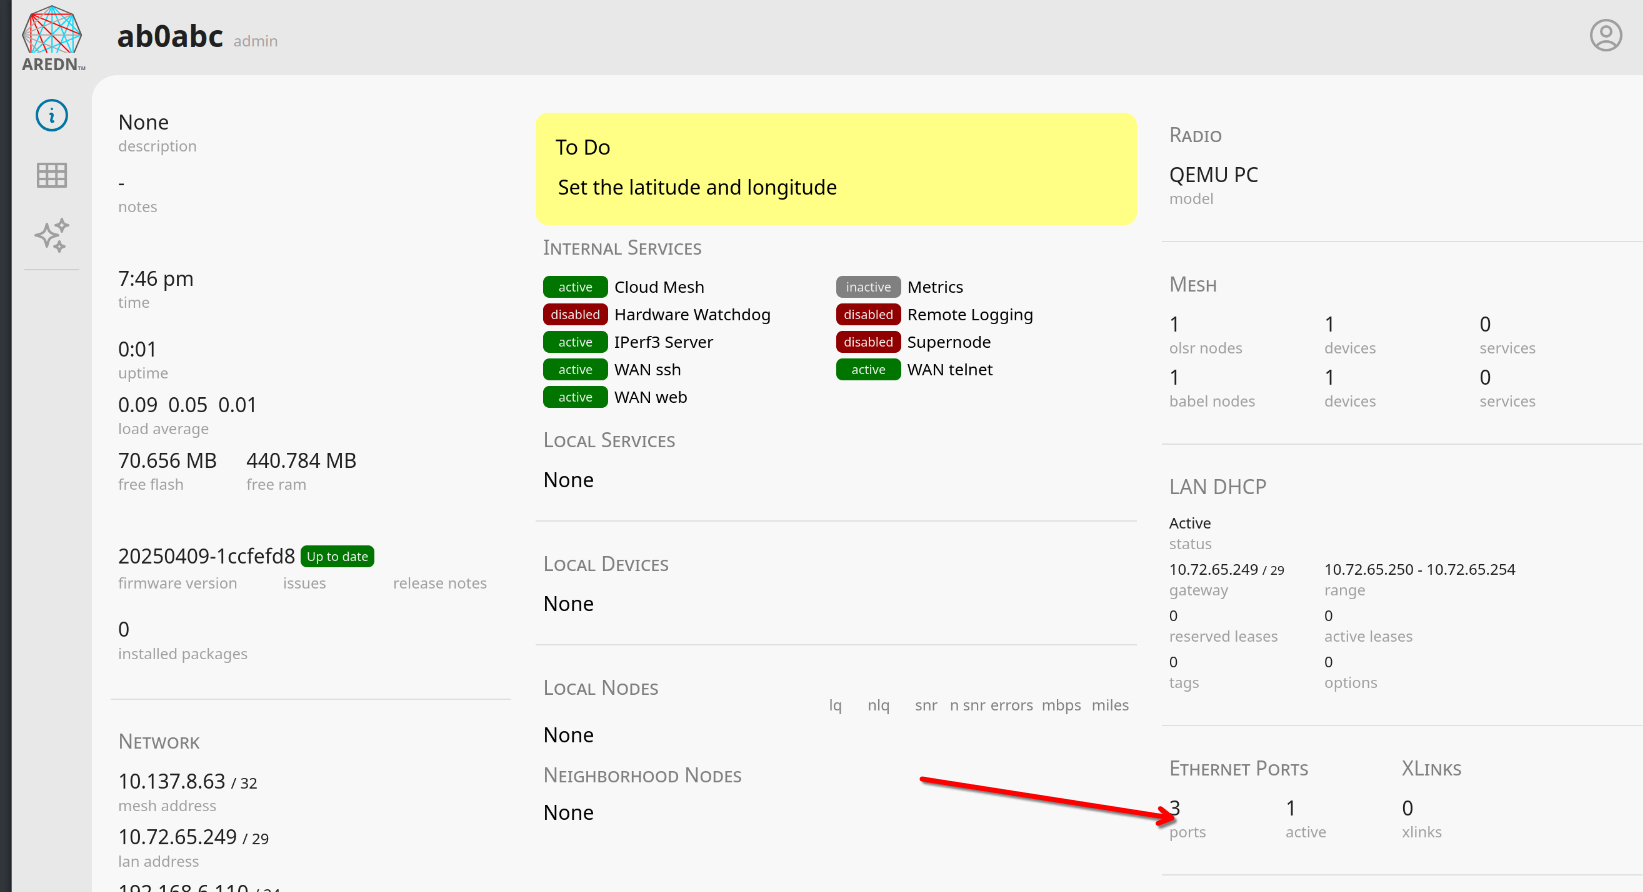
- Assign your LAN and DtD interfaces appropriately. If you’ve been following this guide, then you’ll probably want to do it as highlighted in the following screenshot.
VM-specific niceties
I like to take this opportunity to install the qemu-guest-agent on my VM now that it’s mostly configured and has internet access. This allows the hypervisor to make a few limited API calls to the guest to better manage resources, report network status, call filesystem hooks for freeze/thaw prior to snapshots, and perform graceful shutdowns and reboots. This is strictly necessary, but you’ve already gone through all the work of installing AREDN on your PVE cluster, might as well go all the way.
- Navigate to the
Packagessection of your AREDN webUI. - Refresh the package cache at the top.
- Open the
Download Packagedropdown and selectqemu-gaat the bottom. Install that.
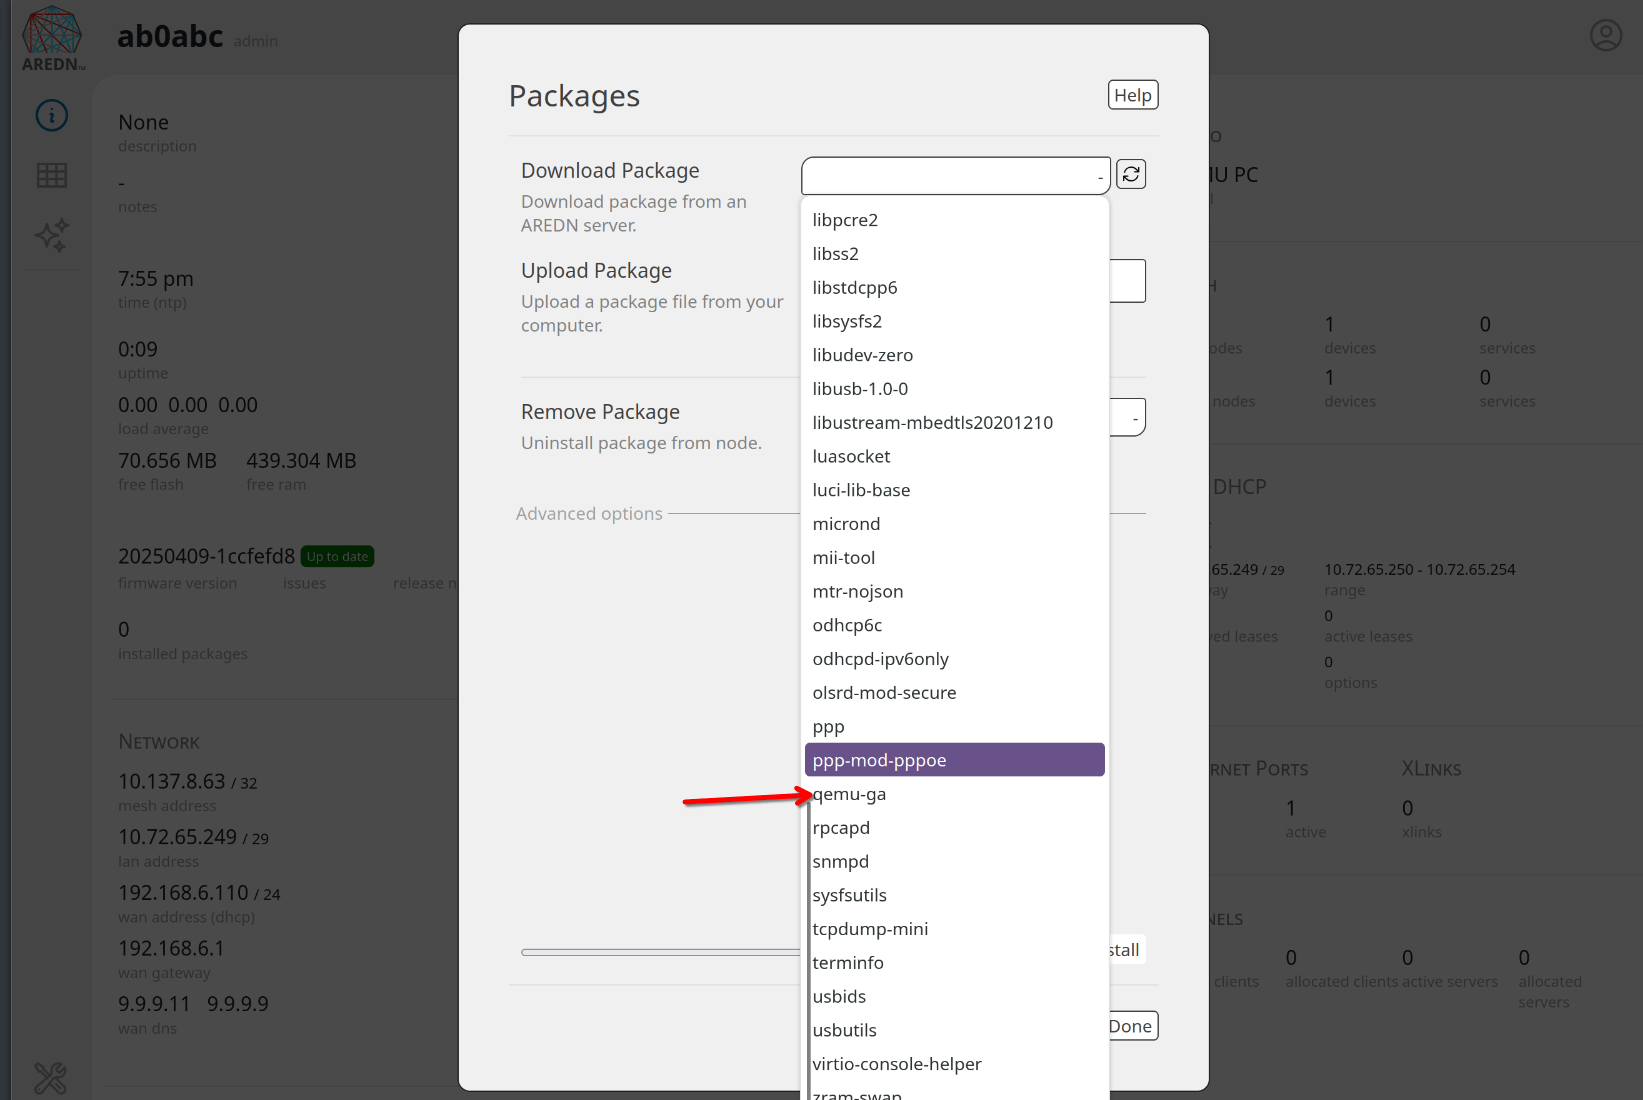
- Reboot, and you should have a working guest agent. Your PVE console should report that the guest agent is running and also report at least one IP address.
Conclusion
You’ve done it! AREDN is now running on your PVE host as a virtual workload. There are a lot of specifics that I didn’t cover here, like VLAN configuration, switch configuration, router interface configuration, firewall rules, etc. The reality here is that these are topics of intermediate networking and are an entire curriculum of themselves. These are just my musings and experimentation with homelabbing and ham radio. Maybe in the future I’ll write some more on networking.
The rest of your AREDN config can be done in accordance with their documentation. See the docs for more.
For now, 73!
#HackThePlanet